SSH
About SSH
The Secure Shell Protocol (SSH) is a cryptographic network protocol for operating network services securely over an unsecured network. Typical applications include remote command-line, login, and remote command execution, but any network service can be secured with SSH
SSH is the preferred method we use to work on remote servers: it can be used to connect and to open a new terminal remotely, retrieve files and executing commands. In order to be able to work on a remote server with SSH, there are some conditions to be satisfied:
A SSH server instance need to be up and running on a remote machine
You are allowed to connect on a remote machine
You need a SSH client on your local machine to be able to start a connection
While the first two points are a matter of the remote server system administrator, you require to install a configure a client in order to work on remote server.
SSH Authentication
There are many to authenticate yourself to a remote server using SSH protocol, however the most common are:
Password authentication: Client will ask you to enter a password, will encrypt it and use it to authenticate itself to a server.
Public key authentication: Each client uses a key pair to authenticate itself to a server. There will be a private key which identity the user and a public key which need to be present remotely on the server. To allow connections from client, server should find the corresponding public key in the list of allowed keys and, more important, the pairing between keys need to be preserved: you can’t connect using a private key of a different key pair.
Warning
In our infrastructure we have disabled the password authentication, only the public key authentication is allowed
For more information see 6 ssh authentication methods.
SSH Clients
There are a lot of SSH clients, which depends on the operating system you have and your personal preferences. Despite they are different in configuration and usage, they act in the same way while working with remote servers.
Hint
Despite the number of different way to provide remote access using SSH protocol, the OpenSSH method is the preferred and most recommended way to connect to our infrastructure
Warning
In our shared environment we provide SSH access only via public key authentication. You need to understand how your ssh client works and how to generate a private/public keys pair order to connect to our remote machines. Only the public key need to be forwarded to the system administrator in order to grant you the access on a shared remote machine. Your private key need to be stored securely and never be sent to anyone in order to enforce security and prevent others to access to your resources using your credentials. Please see ssh documentation regarding public key authentication
OpenSSH
OpenSSH is the de facto standard for remote login with SSH protocol in Linux/MacOS
environments. Beyond login, it provides file transfer with scp and sftp, it
manages keys with ssh-keygen and ssh-copy-id and provide more advanced functionalities
with ssh-agent. More info on OpenSSH could be found on the OpenSSH website.
To discover if you have the OpenSSH client installed on your local (Unix) machine, simply type:
$ ssh
on your terminal. In case you don’t have OpenSSH installed, you could install the
openssh-client package (there’s also a openssh-server but is required only
if you want to provide remote connections on your local machine)
Hint
Starting from Windows 10, ssh client is included in the operating system and
available through windows PowerShell. Open PowerShell and type ssh to see
if it’s installed. If not, you should add it from the Windows Features panel.
Generate a public key pair with OpenSSH
The easiest way to generate a key pairs on Linux/MacOS using ssh is by using ssh-keygen. This
util requests to you to provide the path where to store the key pair and a passphrase
required when using your key pairs. You could reply with no arguments (simply press
enter key) to leave the default options:
$ ssh-keygen
Generating public/private rsa key pair.
Enter file in which to save the key (<your home>/.ssh/id_rsa):
Enter passphrase (empty for no passphrase):
Your identification has been saved in <your home>/.ssh/id_rsa
Your public key has been saved in <your home>/.ssh/id_rsa.pub
Hint
The default paths for public/private rsa key pairs are <your home>/.ssh/id_rsa
and <your home>/.ssh/id_rsa.pub. We suggest to keep the default paths for
simplicity. If you specify custom paths or files for key pairs, you will need
to specify the private key path when using SSH, for example to connect to a
remote server with ssh
when copying files using rsync with ssh
remote protocol or using scp and to mount remote
folders using sshfs
In case you have already generated a key pair with the same file name, you are prompted if you want to overwrite your key pair:
<your home>/.ssh/id_rsa already exists.
Overwrite (y/n)?
Danger
Please, be careful before generating a new key pair: if you overwrite an existent key, you will not be able to connect remotely to other machines configured with the old key pair
Please keep track of your public key (which is the one with the .pub extension,
the id_rsa.pub file). If you used the default options, such file is stored in your
$HOME/.ssh/ folder): This is the file you need to provide to your system
administrator in order to be able to connect remotely. After that, please see
OpenSSH section under Remote connection to a Server
section.
Hint
In Windows, you can generate a key pair using the ssh-keygen.exe command in
Windows PowerShell. The options are the same as in Unix environment.
MobaXterm
MobaXterm is an enhanced terminal for Windows with X11 server, tabbed SSH client, network tools and much more. If you are on a Windows machine, you could download and install MobaXterm to have a full terminal and a file transfer in the same application.
Generate a public key pair with MobaXterm
Open MobaXterm and on the principal panel, click on the Start local terminal button:
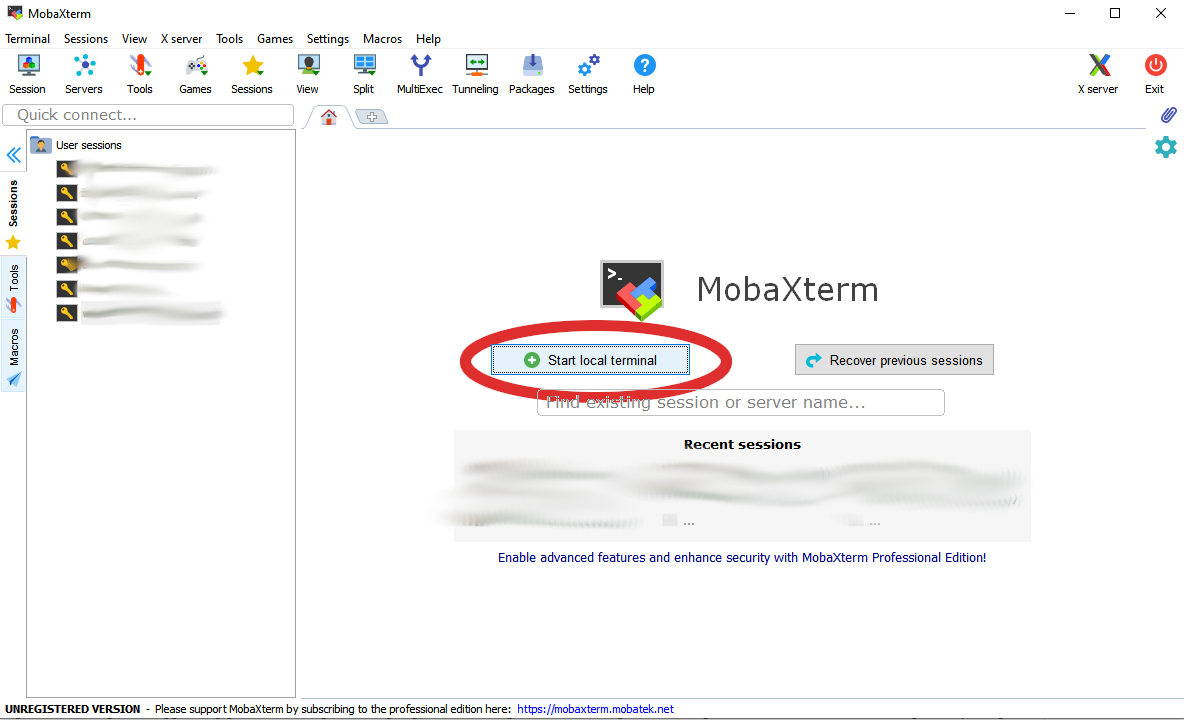
This will open Linux-like terminal windows in MobaXterm, where some linux commands are supported. Here you can create a key like OpenSSH, so follow the Generate a public key pair with OpenSSH documentation, then move to Connecting with MobaXterm documentation.
Windows App
Windows 10 lets you to install a Linux distribution from its app store with Windows Subsystem for Linux (WSL): this lets you to install almost a complete GNU/Linux environment directly on Windows without installing a virtual machine or setting up dualboot (see WSL documentation for more information). There are two major release of WSL, WSL1 and WSL2 (see WSL comparison to see differences between the two versions). Briefly WSL1 was the first attempt to import a Linux kernel in Windows and is lighter and easier to install compared to WSL2. WSL2 however is more advanced and implements a full virtualization of the Linux kernel: this means that the environment is more similar to a Linux environment, more performant and there’s also the support for Docker natively. This type of virtualization is completed supported by Windows, so this means that you can’t install another VM Hypervisor (such as oracle VirtualBox or VMware) and exploit all its advanced functionalities. At the moment, configuring WSL1 or WSL2 is quite tricky, so please follow the official Microsoft documentation on Windows Subsystem for Linux Installation Guide for Windows 10. After enabling WSL, you can install any distribution you like from Windows App Store.
Generate a public key pair with Windows App
When you open your installed Linux application (like the Ubuntu App), you will have a full terminal like any Linux distribution. The instruction on how to generate a public key are the same of Generate a public key pair with OpenSSH. Also, connections to remote server are made using OpenSSH, see Connecting with OpenSSH section
Visual Studio Code
The Visual Studio Code Remote - SSH extension enables you to open a remote folder on any remote machine, virtual machine, or container with an active SSH server, leveraging the full feature set of VS Code. Once connected, you can interact with files and folders across the remote filesystem.
You don’t need any source code on your local machine to utilize these features, as the extension executes commands and other extensions directly on the remote machine. The extension will install the VS Code Server on the remote OS, which operates independently of any existing VS Code installation on the remote OS.
In order to use VSCode with SSH, you need to:
Have any OpenSSH compatible client installed on your local machine
Have Visual Studio Code installed on your local machine
Install the Remote - SSH extension on your local machine or the Remote Development extension pack which includes the Remote - SSH extension with other remote extensions
Generate a public key pair with VSCode
VSCode will use the OpenSSH client installed on your local machine to connect to remote servers. You can generate a key pair using the same procedure as described in the Generate a public key pair with OpenSSH section.
Putty and WinSCP
Putty and WinSCP are respectively two softwares for two different tasks: the first connects to the remote servers and gives you only a terminal; The second could be useful for data transfer between remote and local directories.
Generate a public key pair with PuttyGen
Putty and WinSCP works with Putty key files which are quite different from key files you can create with OpenSSH. In order to generate such keys, you will need Putty Key Generator, which comes with Putty software.
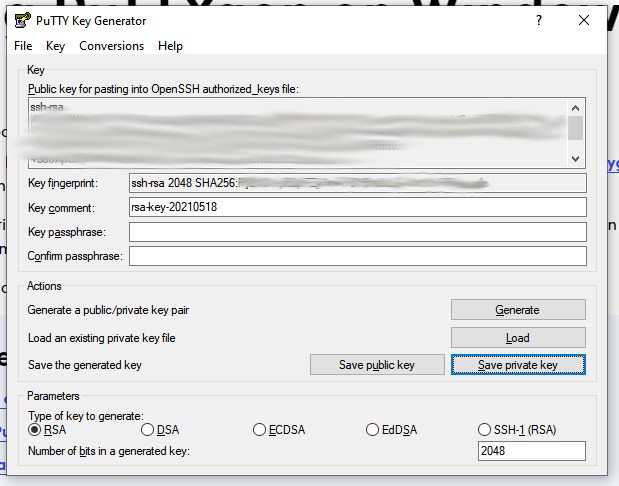
From the Putty Key Generator main screen, you need to generate a new key pair with the Generate button. Follow the instructions when generating a new key. Next, you need to click on Save public key buttons and Save private key to save a public key and a Putty Key respectively. The public key you save is the one you need to share with your system administrator.
Tip
You could convert the putty public key in OpenSSH public key as described this StackOverflow answer:
ssh-keygen -i -f keyfile.pub > newkeyfile.pub
If you don’t have ssh-keygen in your system, ask your sysadmin to do it for you.
Hint
You could import also a OpenSSH public key and convert into Putty key using Putty Key Generator
Once you created (and saved) your Putty key file, see the Connecting with Putty section to connect to your remote server. If you need more information on puttygen and Putty key, see This guide.
Remote connection to a Server
In order to connect to a remote server with a public key pair, your public key file
need to be placed inside your $HOME/.ssh/authorized_keys file on remote host:
$ tree .ssh/
.ssh/
├── authorized_keys
└── known_hosts
Moreover, in order to connect, those files need to be accessed only by your user
(with the 700 and 600 chmod permissions for directory and files
respectively):
$ ll -d .ssh/
drwx------ 2 cozzip cozzip 100 May 12 12:42 .ssh/
$ ll .ssh/authorized_keys
-rw------- 1 cozzip cozzip 3.2K May  6 10:02 .ssh/authorized_keys
Those permission are required in order to allow remote connections. If not, you
can’t use your public key for authentication. To copy your public key in the
remote $HOME/.ssh/authorized_keys file, you can copy your public key inside
the remote machine and then adding this public key to the authorized_keys file,
for example if your public key is named id_rsa.pub you can do like this:
cat id_rsa.pub >> $HOME/.ssh/authorized_keys
The previous command need to be executed in the remote environment (where you need to connect).
Copy public keys with ssh-copy-id
In linux there’s the ssh-copy-id utility that will add automatically your
local public key to the remote authorized_keys from your local terminal:
ssh-copy-id -i $HOME/.ssh/id_rsa.pub <user>@<remote server>
Where the option -i define the path of your public key file. <user> and
<remote server> are respectively your username in the remote machine and
the remote machine address (which could be an ip address like 192.168.122.100
or a domain name). This script will copy your public key in the authorized_keys
and will check the correct permissions.
Hint
SSH access without public key is disabled in our infrastructure, so you can’t copy
a public key by yourself for the first time. This is why you have to provide
the public key to the system administrator. After your access is granted,
you can use ssh-copy-id to copy another public key (of another machine
for example) from a machine where the key pair is enabled, for example:
ssh-copy-id -f -i /path/to/another/public_key.pub <user>@<remote server>
the -f option will force the copy of a public key without ensuring the existence
of the proper identity file.
Connecting with OpenSSH
Start a new connection
In order to remote-connect using OpenSSH (once your public key is properly set),
you need to call ssh command by specify your remote username and remote machine:
this can be done in both Unix and Windows (through PowerShell) environments,
for example:
ssh <user>@<remote server>
This will be sufficient to login, if you have your private key in the default
location (you haven’t specified a different path for your key files during creation).
In case you don’t have your private key in the default location (or you have chosen
a different name) you could provide your private key file with the -i identity
option:
ssh -i /path/to/your/private/id_rsa <user>@<remote server>
Hint
If you have choose a passphrase when creating your key pairs, you require to provide the same passphrase when connecting to a remote server with such key pair. A more pretty solution could be to load your key in a ssh-agent and provide the passphrase once. The agent will provide your keys everytime needed without asking for passphrase. Simply type:
$ ssh-add /path/to/your/private/id_rsa
before connecting with ssh. See
Passwordless Login
for more information
Warning
If you are trying to connect to a remote server for the first time, you will receive a message like this:
The authenticity of host 'xxxxxxxxxxxxxx (xxx.xxx.xxx.xxx)' can't be established.
ECDSA key fingerprint is SHA256:cdjcdncjdsnckjnscjkndcjkdsckmdkcmdkcd.
Are you sure you want to continue connecting (yes/no/[fingerprint])?
Simply type yes when prompted and you will proceed with connection.
The host/ip address of the remote server will be placed in your
$HOME/.ssh/known_hosts file. This message will not be printed again when
connecting to the same host.
Danger
Every time you start new a connection to a remote server, ssh checks server
fingerprint with the information stored in .ssh/known_hosts. If the server
fingerprint is different, the connection is immediately terminated. There could
be different reasons when you see this behavior, for example your administrator
may have changed the destination server using the same server name or maybe
someone has hacked your server configuration or connection. When you see an issue
like this, please tell immediately it to your system administrator.
Closing a connection
To exit from the remote terminal and logout from the remote server, simply type:
$ exit
in order to close the remote session.
OpenSSH connection options
OpenSSH lets you store connection parameters in the $HOME/.ssh/config
configuration file. There are options which are applied every time you start a OpenSSH
connection with ssh or options that are applied only on specific remote server.
You could also choose to override global configuration by specifying the same parameters
in the specific remote section. The $HOME/.ssh/config could be structured like
this:
# these settings are applied every time you start a ssh connection
ServerAliveInterval=60
ServerAliveCountMax=20
ConnectTimeout=60

# The following settings are host specific. The pattern is valid for all the
# 192.168.122.0/24 subnet (every server from 192.168.122.1 to 192.168.122.254)
Host 192.168.122.*
  # these option will replace the default ones with new values
  ServerAliveInterval=30
  ServerAliveCountMax=10
  ConnectTimeout=30

  # you can provide a specific identity for such remote server
  IdentitiesOnly yes
  IdentityFile /path/to/your/private/id_rsa
The IdentityFile could be used to define your private key location, in order
to not provide your identity file every time you start a new connection,
ServerAliveInterval, ServerAliveCountMax and ConnectTimeout are respectively
timers which regulate the timeouts when connecting and in sending messages between
client and servers. They could be useful when connecting using a unreliable network.
For more information on ssh config and keys see
Associating Keys Permanently with a Server,
while for more information on ssh client options see the ssh manual pages
Connecting with MobaXterm
To connect with MobaXterm for the first time, it’s better to create a new session by clicking on the Session button and then on the SSH button for session type, as shown in the following figure:
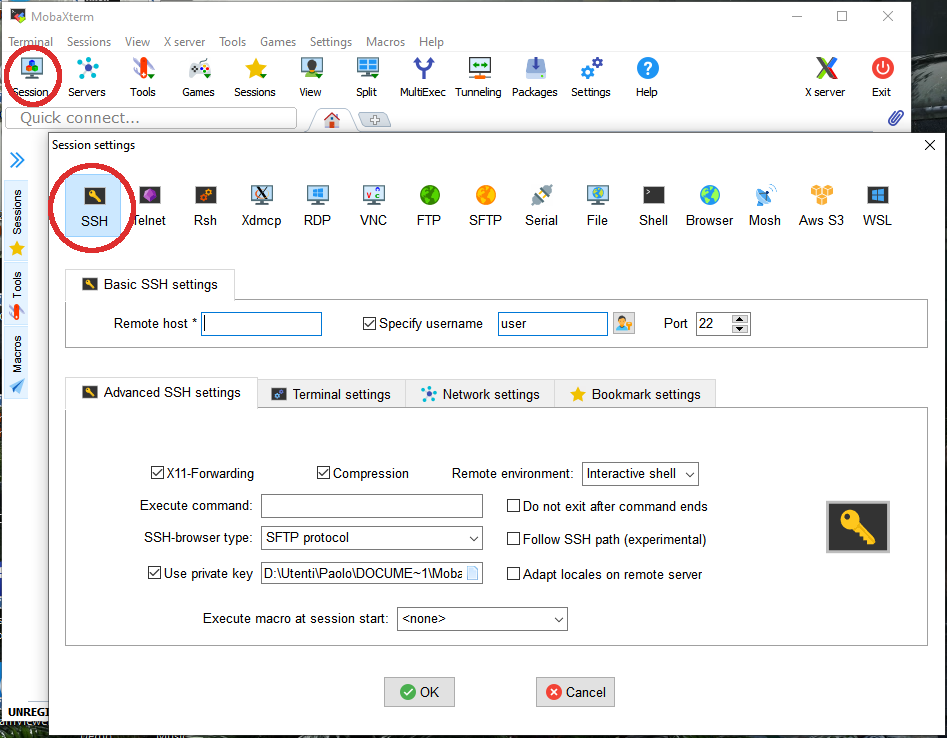
Set the remote server hostname or ip address in Remote host box. Click on Specify username checkbox and then type the username provided to you by the sysadmin. Check the Use private key checkbox and if you have created your public key as described in the MobaXterm section, you will see the position of your public key file. Check if path is correct or set the correct path of your public key file if you have stored it in another location. In the Bookmark settings tab you can define a session name to easily find all your saved sessions. After that, click on the Ok button to save your session configuration. You will see all your saved session by clicking on the Sessions tab (the tab with a Star on the left of the main session) and you can start a new connection by clicking to the session name you have previously configured. Fore more information, see MobaXterm documentation
Connecting with Visual Studio Code
To connect to a remote server using Visual Studio Code, first ensure you can connect
to the remote server using OpenSSH from a terminal / PowerShell. Once you have
successfully connected to the remote server, from visual studio code select
Remote-SSH: Connect to Host… from the command palette (Ctrl+Shift+P) and
enter the remote server address in the format <user>@<remote server> as you
did with OpenSSH.
Hint
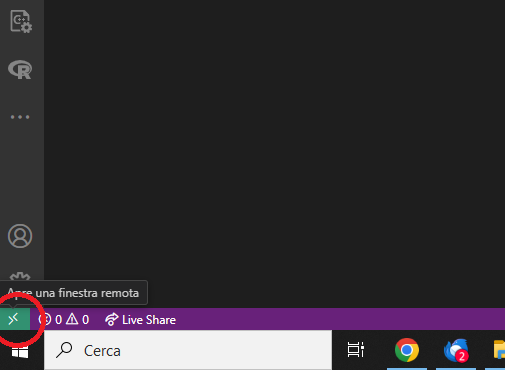
In alternative, you can click on the green icon in the bottom left corner of the Visual Studio Code window and select Remote-SSH: Connect to Host….
If VS Code cannot automatically detect the type of server you are connecting to, you will be asked to select the type manually. After a moment, VS Code will connect to the SSH server and set itself up. VS Code will keep you up-to-date using a progress notification and you can see a detailed log in the Remote - SSH output channel. Finally you will be connected to the remote server and you can start working on your remote files as if they were local. For more information, please see Remote Development using SSH guide for Visual Studio Code.
Configure terminal for remote sessions
To configure the terminal for remote sessions in order to act like when you
connect into remote server using OpenSSH with the full initialization of environment
variables, you need to configure the terminal.integrated.profiles.linux in
your settings.json for the remote connection profile. Open the VScode settings
and then on the remote tab, which can be WSL or any user@host connection you
have configured. Then in the search box, paste the terminal.integrated.profiles.linux,
you should find a box in which it is possible to open the settings.json file
for changes. Find the bash section and add args like this:
args: [
  "-l"
]
Your final configuration file for remote connection should look like this (at
least for bash section):
"terminal.integrated.profiles.linux": {
      "bash": {
          "path": "bash",
          "icon": "terminal-bash",
          "args": [
             "-l"
          ]
      }
  }
Save the file and restart VSCode. Now, when you open a terminal in a remote connection, you will have the same environment variables and initialization as when you connect to a remote server using OpenSSH.
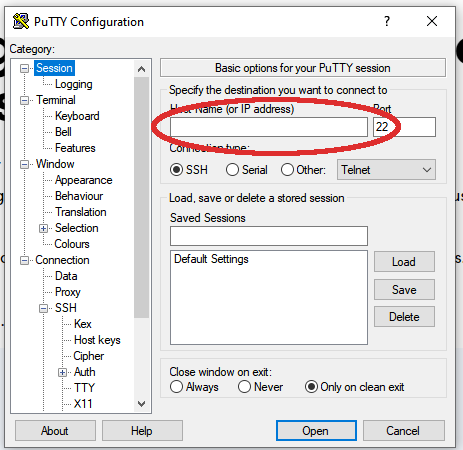
Connecting with Putty
After opening Putty application, fill Host Name in Session tab with your remote server name or ip address:
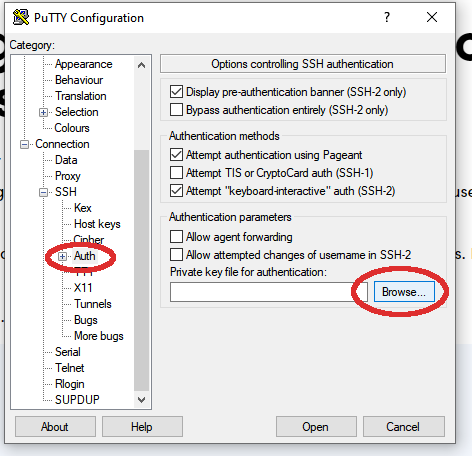
Next, under the Connection->SSH->Auth tab browse and locate your Putty key file
(the one with .ppk extension)
After that, click on the Open button to start a new connection. You will be prompted for your username after starting a connection.
Copy remote files
Copying files using OpenSSH
There are two ways to copy a file using OpenSSH: scp and rsync.
scp is part of OpenSSH package while rsync is another utility to copy file
which supports SSH protocol. Despite the two methods are valid, rsync is the
recommended way since it can do incremental copy (ie copy only new or updated files)
and can preserve file permissions and times (which are useful to understand if a
file is updated or not).
SCP
scp works like linux cp but support remote origin or destination. Simple
prefix your source or destination path with <user>@<remote server> as you do when
connecting using OpenSSH, for example to copy recursively from a remote folder in
your local environment:
$ scp -r <user>@<remote server>:/remote/src/path /local/dst/path
If you want to copy a local folder into a remote folder, simply add the
<user>@<remote server> before destination directory:
$scp -r /local/src/path <user>@<remote server>:/remote/dst/path
Note
remember to add a : between <user>@<remote server> and your remote folder,
otherwise you will do a local copy with <user>@<remote server> as prefix.
<user>@<remote server>: without destination folder is a shortcut for your remote
$HOME directory
Warning
The main issue with scp is that you can’t copy file attributes, for example
timings: your copied file will have the created/modified time when the copy occurs,
and you can’t define the most updated file simply relying on date. Moreover, if you
remote copy a folder using scp, you will copy the whole directory content,
independently if destination files are already present or aren’t changed. This
need to be taken into consideration for example if there are network issues during
copying and you need to executing the same command again: for those reasons,
rsync is the recommended way to copy or backup files using OpenSSH.
Rsync
rsync is the recommended way to backup or copy files from/to remote services:
it checks contents in destination folder in order to save time and bandwidth by copying
only new or modified files. Command is similar to scp, however there are additional
parameters that need to be mastered in order to take full advantage of rsync. For
example, to copy files from local to remote your could do like this:
$ rsync -vare ssh /local/src/path <user>@<remote server>:/remote/dst/path
Here are the main options of rsync:
-v: verbose transfer-a: archive (track attributes like permissions)-r: recursively-e ssh:-edefine the protocol used in transfer, need to be followed immediately byssh. You can specify parameters in different order, but when you set-eparameter, you need to specifysshprotocol.
There are other options that are useful and that can be added to rsync command
line:
-P: combines--progressand--partialoptions to display transfer progress and allow resuming of interrupted transfers-u: skip files that are newer on destination-n: dry-run (useful in testingrsynccommands)-z: use gzip while transferring (useful with text files and slow connections)--del: delete destination files if they don’t exists on source (use with caution, testrsynccommand before apply)--exclude=pattern: exclude pattern fromrsync--chown=<user>:<group>: set destination ownership (userandgroupneed to exists in destination)
Warning
With rsync a path like /local/source/folder/ (with final /) is
a shortcut for all file contents in folder (ie /local/source/folder/*),
while omitting the final / mean the folder itself. So a command like:
$ rsync -vare ssh /local/src/path1/ <user>@<remote server>:/remote/dst/path2/
Will place all path1 contents in path2 contents, while:
$ rsync -vare ssh /local/src/path1 <user>@<remote server>:/remote/dst/path2/
Will place path1 directory in path2 (so, destination will be: /remote/dst/path2/path1).
The same applies by avoiding the final \ in destination path. Please,
launch a dry-run rsync (with -n option) to ensure that your rsync command
line is correct
Copying files using MobaXterm
Click on Scp button on the left of the main terminal after opening a session on the remote server, as shown in figure:
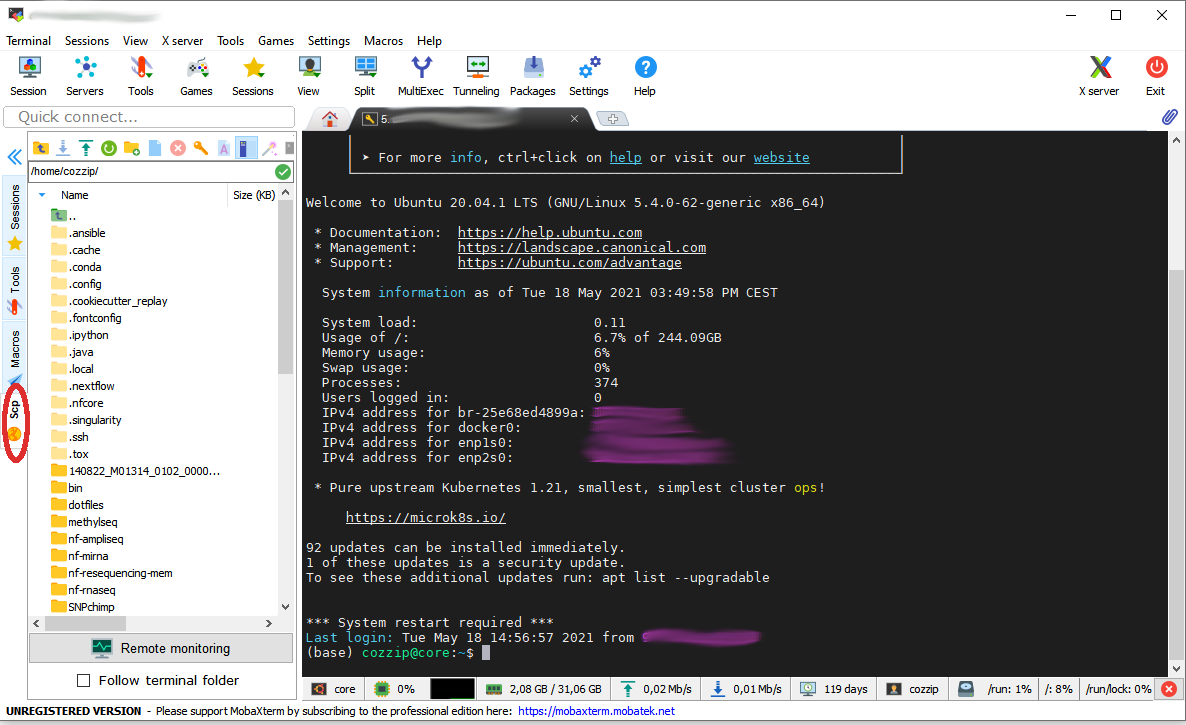
The file browser on the left is quite similar to other file browsers, you can click on a file to show/download it.
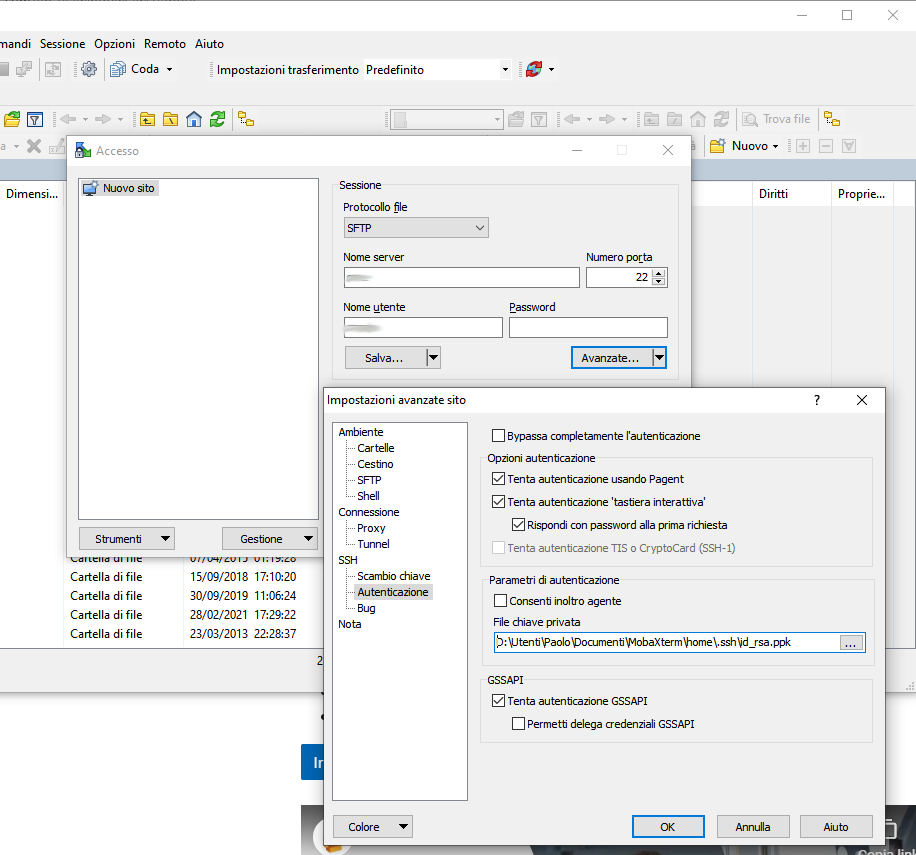
Copying files using WinSCP
Start a new WinSCP connection by clicking on the Advanced button, in SSH->Authentication section provide your Putty key file. Next, on the main section fill User and Name server fields with proper values to start a new connection as shown in figure:
Hint
If you have an OpenSSH key pair, you can automatically convert it into Putty key file. WinSCP will make the conversion for you.
Configure SSH for remote sessions
There are some options that can be set up in your $HOME/.ssh/config file, which
can be helpful with your SSH connections. For example, you can define time intervals
in which your local terminal send messages to the remote server and wait for its
replies, in order to keep connection alive and help avoiding terminal freezing
during a SSH section. Those parameters are ServerAliveInterval, ServerAliveCountMax
and ConnectTimeout which can be configured like the following in your
$HOME/.ssh/config file:
# These settings will make the SSH client or server send a null packet to the
# other side every ServerAliveInterval seconds, and give up if it doesn’t receive a
# null response after ServerAliveCountMax tries, at which point the connection is
# likely to have been discarded anyway.

# Sets a timeout interval in seconds after which if no data has been received from
# the server, ssh(1) will send a message through the encrypted channel to
# request a response from the server.  The default is 0, indicating that these messages
# will not be sent to the server, or 300 if the BatchMode option is set. This option
# applies to protocol version 2 only.  ProtocolKeepAlives and SetupTimeOut are Debian-specific
# compatibility aliases for this option.
ServerAliveInterval=60

# Sets the number of server alive messages (see below) which may be sent without ssh(1)
# receiving any messages back from the server.  If this threshold is reached while
# server alive messages are being sent, ssh will disconnect from the server, terminating
# the session.  It is important to note that the use of server alive messages is very
# different from TCPKeepAlive (below).  The server alive messages are sent through
# the encrypted channel and therefore will not be spoofable.  The TCP keepalive option
# enabled by TCPKeepAlive is spoofable.  The server alive mechanism is valuable when
# the client or server depend on knowing when a connection has become inactive.
ServerAliveCountMax=20

# TCPKeepAlive operates on the TCP layer. It sends an empty TCP ACK packet. Firewalls
# can be configured to ignore these packets, so if you go through a firewall that
# drops idle connections, these may not keep the connection alive. The TCP keepalive
# option enabled by TCPKeepAlive is spoofable. Default yes
# TCPKeepAlive yes

# Specifies the timeout (in seconds) used when connecting to the SSH server,
# instead of using the default system TCP timeout. This timeout is applied both
# to establishing the connection and to performing the initial SSH protocol hand‐
# shake and key exchange.
ConnectTimeout=60
These configurations applied like here are applied in each SSH connection. You can also configure parameters in order to be applied only on certain connections like this:
Host localhost
  UserKnownHostsFile=/dev/null
  StrictHostKeyChecking=no
  ServerAliveInterval=30
  ServerAliveCountMax=40
in the previous case, the default values of ServerAliveInterval and ServerAliveCountMax
are replaced by these new ones, which will be applied only when connecting to localhost
(for example, when you use tunnels to reach remote ports through a firewalled network).
Host syntax supports wildcards, like 192.168.1.* or *.ibba.cnr.it: in
these cases, configurations will be applied on all SSH session matching these patterns.
Hint
Sometimes you work with a very slow connection, so it will be useful raising the
values of ServerAliveInterval and ServerAliveCountMax in order to avoid
to be closed out from the remote terminal. However, raising this values a lot will
freeze your terminal for a long time in the case that your connection is lost.
Please consider to raise up this parameters accordingly your needs but not exceed
reasonable times.
SSH Muliplexing
Multiplexing is the ability to send more than one signal over a single line or connection. In OpenSSH, multiplexing can re-use an existing outgoing TCP connection for multiple concurrent SSH sessions to a remote SSH server, avoiding the overhead of creating a new TCP connection and reauthenticating each time.
When using multiplexing you will connect once and then all the other connections
to the same resource will re-use the already defined connection, thus avoiding
the creation of new TCP connection and the negotiation of a secure connection.
This will help a lot when using ssh-agent or others authentication softwares
like the step client:
you will need to authenticate in a terminal and then you can login from different
terminals or applications like VSCode.
Activities that repeatedly open new connections can be significantly sped up
using multiplexing. In order to use SSH with multiplexing, add this to your
$HOME/.ssh/config file:
# inspired from https://superuser.com/a/879696
Host <an alias for your host>
    HostName <the full hostname or ip address>
    User <your remote username>
    ControlPath ~/.ssh/controlmasters/%r@%h:%p
    ControlMaster auto
    ControlPersist 10m
The Host directive can accept the full hostname, the IP address or an alias
for your connection. If you specify an alias, you will need to specify the
full domain name or ip address with the HostName directive. The
ControlMaster auto directive will create a new multiplex connection if doesn’t
exists, will reuse the connection if already established and will remove the
connection after a certain amount of time defined by the ControlPersist directive.
Next you will need to ensure that the ControlPath path (without the %r@%h:%p
token) is present, for example with:
mkdir ~/.ssh/controlmasters
Hint
Mind to ssh folder permissions when dealing with ssh folder.
After that you can connect to the remote server using SSH as usual.
Hint
You can check connection status using:
ssh -O check <user>@<remote server>

## Or if you defined a connection alias, like the example

ssh -O check <alias>
Warning
If you lose the network connection, the multiplexed connection is not more valid.
You will need to manually remove the ControlPath file or terminate the
multiplexed connection with:
ssh -O stop <user>@<remote server> # Or ssh -O stop <alias>
For more information, see OpenSSH/Cookbook/Multiplexing and How To Reuse SSH Connection…
Mount remote folders using SSH
It is possible to mount a remote folder in your local environment using sshfs.
Briefly, this utility lets you to mount a remote folder into your local environment
using SSH as protocol. This has the benefit that you could see the remote
files like as they are on your local environment. For example, by mounting a
folder using sshfs, you can edit your remote files with your preferred editor or
inspect remote file contents using your file browser.
In linux, you can mount remote folder by installing sshfs package. For MacOS,
you need oxfuse package. After installing required
packages, you need to create the destination path in which you will mount the remote
folder. For example:
$ sudo mkdir /mnt/core
Hint
If you create a directory outside your $HOME directory, where you don’t
have permissions, you need to call command with sudo in order to create
such folder. Next, ensure you own such directory in order to mount remote
folder (as a user without using sudo more):
$ sudo chown $USER:$USER /mnt/core
After that, you could mount the remote folder with:
$ sshfs -o idmap=user <user>@<remote server>:<remote directory> /mnt/core/
-o idmap=user is an option required in order to save/retrieve files with your
ssh credentials (this because your local user could be different from your remote
user required to create/access files remotely).
Hint
there’s also the -o follow_symlinks option, which is useful when mounting a folder with symlinks pointing outside the mounted folder
If you need to unmount a folder:
$ fusermount -u /mnt/core
# Or if you are on a mach and you don't have ``fuse`` installed
$ sudo umount /mnt/core
For more information, see How To Use SSHFS to Mount Remote File Systems Over SSH